
Hello Creatives....
Sarinda here for your mid- week muse with a fun tutorial using Encaustic mediums by R&F Encaustic Paints and Artistcellar.com stencils. Well- there is a lot to talk about so let's get started-!!
Here is what you will need:
- Artistcellar Playful Pods Stencils & Balzer Designs cursive alpha stencil
- Cradle board
- Pencils
- Charcoal
- India Ink
- Brush for India Ink
- Carving tools
- Razor blades about 20
- R&F encaustic paint
- R&F encaustic medium
- R&F encaustic gesso
- Gesso Brush
- Fusing tool (Paint stripper gun)
- Griddle for heat surface
- Painters tape
- Griddle thermometer

Prep the cradle board by taping the edge of the board so that it will not get wax on it.

Apply R&F gesso to the board and let dry completely.

Balzer Designs Alpha stencil outline the letters. On the finished piece some of the graphite will still be seen.

Outline some of the graphite tracings with a quill pen or a thin liner brush. I did not do all of them just here and there.

Doodle some ovals, lines and dots with charcoal. Take a rag and swipe the charcoal to smudge it.

Applying the encaustic medium.
Caution: Keep in mind that the wax should never fume or smoke.... keep heated under 200 degrees. The fumes are harmful to you.


Slowly heat the surface constantly moving the heat gun around. Watch for an even shiny surface. Try not to over heat in areas. The goal is to get the surface as smooth as you can. Let the surface get entirely cold.

Scrape the surface to create the most even surface that you can. Try scraping in all directions to achieve this.
Anything that you add to a new layer it will need to be fused to the last with the heat gun. I added about 4 layers to the base for depth. This is where you will get the repeat button.... It will always look like this.
1-Base elements
2-Wax
3-Fuse
4-Cool
5-Scrape
6-REPEAT

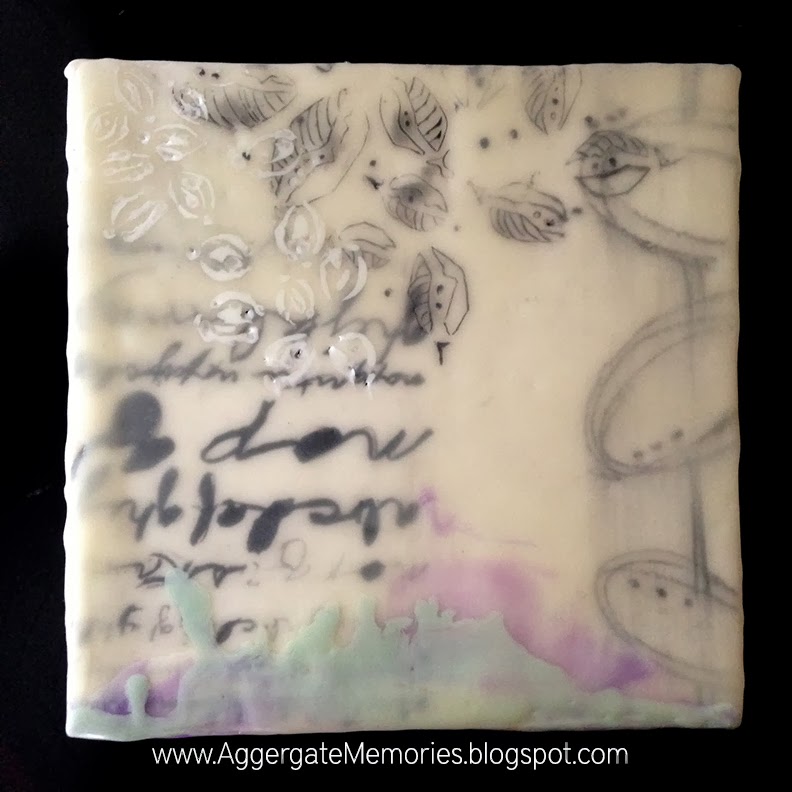
I laid the Playful Pods stencil on top of prepared surface. Then carved an outline into the wax and filled it in with dark gray R&F encaustic wax with a brush. Fused slightly. Once cooled completely I too a razor bade and scraped off the surface.
I was planning on doing an all black and white work. Yet- Purple was talking to me. SO I added a bit to one side and let it drip.
1-Base elements
2-Wax
3-Fuse
4-Cool
5-Scrape
6-REPEAT

Wanting a bit of white to pop off the surface and another layer of depth. Carved another Playful Pods stencil in the surface shown below.


This is how the surface looked after scraped.


Best
Sarinda
I haven't tried any techniques using encaustic mediums...yet, but the more I see, the more I am thinking I might actually try this! Love that waxy shiny surface! Well done, Sarinda!
ReplyDelete