Definition: Aggregate is a collection of items that are gathered together to form a total quantity.

The fleeting moments of knowledge in which we discover our existence are facts that can be committed to memory. We can enlarge this aggregate memory and refashion it as we go through a lifetime. By saving these memories on paper and reconstructing the images of our lives. We see the art of our lives unfolding before us.

Face the brilliance of your most wonderful creations and dwell on your dreams.
I believe in teaching, the sharing of ideas and playfulness of creating.

Wednesday, October 30, 2013

Artistceller Whimsy Stencils and Magic Tag


Hello Creatives and Happy Hump Day-!!
Sarinda here with a tag tutorial using Tam's New Stencils Whimsy Series and Inspiration Series. These are so much fun to use and they are versatile enough for anytime of the year.
I wanted to do something with snowflakes as it has started to snow where I am. I love this time of the year. The wind blowing the last of the leaves off the trees leaving the skeletons of the branches. The new crisp air in your hair. Well you get the point. I like it.
Here is what you will need for this project:

Step 1:
As you can see I started with a tag that already had some ink on it. I always have a stash of these. It makes creating a little quicker and a great way to use the ink on your craft mat. Just get some ink on the tag for your background. I chose a tag that resembled the sky and ground.

Step 2:
Add some Distress inks to brighten the colors then Spray some water onto your hands and flick in onto the tag. Let dry.


Step 3:
Take Tam's Stencil with the word Magic on it position it on tag. Using your finger add Viva Inka-Gold in Silver to the tag.


Step 4:
Find Tam's House stencil and outline with "S" Pitt Pen in black.

Step 5:
Color the houses with Distress markers and outline or highlight areas with the white pen. This will make the images pop off the page.

Step 6:
Punch out 5 snowflakes and add the glitter glue onto the surface of the flakes. Then glue down with Glossy Accents. Add your twine and ribbon to the top, attach with a button.

Hope you have enjoyed this tutorial. Stay Warm.
Best-
Sarinda

Tuesday, October 29, 2013

SDC123: Fabulous Folds


Hello Creatives, It is STAMPOTIQUE day-!!

And Happy Halloween.

Today Stampotique is hosting SDC123: Make more than one fold in your projects.

I wanted to make something that I can recreate for gifts for the Holidays are around the corner. This will be great.  I will put a gift card inside the bookmark to our local book store, inside of a card that will have the Stampotique Sentiment "Jingle your own damn bells!" 

Perfect don't you think?
Did you notice the book? I love this book!!
There are two folds on the back of this bookmark.

I hope you will stop by Stampotique Designers Blog and play along with us. You could win $30 for your choice of stamps from Stampotique.com.
Looking forward to seeing your amazing creations.

Be Well.
Sarinda 

Here is what I used:

Tuesday, October 22, 2013

SDC122: Lace or Fabric


Stampotique Day-!!!

France is our Hostess today and asking us to use fabric, lace. She loves getting texture in her work by doing this. I think it is a wonderful idea. I used Gel Medium to glue my lace bits down then I used gesso on top. Then some Glossy Accents and Distress Stickles Dry Glitter in Clear Rock Candy.

Hope you can play along with us this week at Stampotique Designers Challenge. You could win $30 in Stampotique Fair.

Best to you.
Sarinda

I used:

Friday, October 18, 2013

Bo Bunny Fright Delight Layout and FotoBella.com


Hello Creatives.

This is a layout that I created using Bo Bunny Fright Delight I want it all bundle from FotoBella.com.
I love to celebrate Dia De Los Muertos!
The Day of the Dead.

Hope you are enjoying the fall weather.
Be Well.
Sarinda
Here is what I used:


Thursday, October 17, 2013

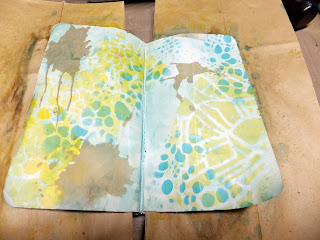
Artistcellar Layering Stencils for Journaling


Hello There and I am Happy to say that it is HUMP Day-!!
Sarinda here for your mid week muse.
Recently, I was lucky enough to attend a Glass Residency at Pilchuck Glass School. It had been 10 years since I had been to this magical place located in Stanwood, WA. Dale Chihuly, a blown glass artist that is the co-founder for the school since 1971.
I wanted to do a small journal page that really does not even skim the surface of the 10 day residency. But every time I look at the page it will flood my mind with all the experiences that reside in my minds eye. I hope you will enjoy this.
What you will need:
§  Journal
§  Distress Paint in various colors
§  Distress Ink pads in various colors
§  2 Distress blending tool (one for inks and one for paint)
§  Gesso
§  Brush
§  Water
§  Spray Bottle
§  Craft Mat
§  Heat tool
§  Paper Towels
Step 1:
You will gesso your journal page and dry with heat tool.


Step 2:
Using your stencils in various places on your journal you will apply the Distress paint with a foam blending tool. How I do this is add the Distress paint to my craft mat and then pick up the paint with the blending tool and dab over the top of the stencil. Dry with heat tool after every layer of paint. This will create a paint resist for the following layers of ink.
TIP: You will want to remove the paint from your stencil with water, ASAP as it will become permanent.
Step 3:
Continue to layer paint until you are happy with the base layer. We will be adding more layers in ink so it is ok to have is sparse.


Step 4:
You will now add the Distress Ink in the same way. Layer after Layer.

Step 5:
Edge your pages with Distress Ink in a dark color, I used black soot and walnut stain. Then you will with spray a little water onto the page start to dry with heat tool and pick up excess with a paper towel. This will show the layers of paint resist underneath.

Step 6:
I used Viva Inka-Gold in Old Silver to add a bit of shimmer to my pages. Then embellish to your hearts content.

Step 7:
Enjoy your pages.
Thank you for joining us for the mid week musing. I wish you very well this last part of the week. Much Love to you.

Sarinda

Glass Site: www.SarindaJones.com

Tuesday, October 15, 2013

SDC121: Spooky Halloween


It is a Stampotique Day-!!! 

Well I should say that it is Stampotique Season.

Carol is our hostess today and she is asking us to put our spooky hat on and do something crazy Spooky. I hope you can stop by Stampotique Designers Blog and play along in this challenge with us.

I used a technique for my background that I learned in Tim Holtz Creative Chemistry 102 Class, Distress Paint Marbling Technique.


So here is what I used on this project: