Definition: Aggregate is a collection of items that are gathered together to form a total quantity.

The fleeting moments of knowledge in which we discover our existence are facts that can be committed to memory. We can enlarge this aggregate memory and refashion it as we go through a lifetime. By saving these memories on paper and reconstructing the images of our lives. We see the art of our lives unfolding before us.

Face the brilliance of your most wonderful creations and dwell on your dreams.
I believe in teaching, the sharing of ideas and playfulness of creating.

Sunday, December 30, 2012

2013 Pocket Calendar Fotobella.com


Hello Crafties.....

Sarinda here from the Fotobell.com Design Team.
I wanted to share a 3"x3" pocket calender for the new year.
There are a few steps to this project... But don't let that scare you away. 
I just wanted to make sure I covered all the details for you.
I had a lot of fun making this one and hope you will too.
Enjoy-!
Sarinda

Supplies:
·       Sticker sheet
·       Enamel Dots
·       Chevron Paper
·       Round Paper
·       Glue
·       Orange bakers twine
·       Small letters and numbers
One sheet of Kraft cardstock
Photo Sizes:
·       N/A
Tools:
·       Silhouette Cameo

Step 1:

1.     Get your Silhouette ready and make sure you have downloaded the current software version. This is important.
2.     Find the correct files. Open up the Silhouette store window and look for these files and purchase them.


Find both the calendar downloads.  Just so you know that this is really easy and Silhouette has a step-by-step instructions in the program. All you have to do is just follow. 

3. In Silhouette open two different windows, one for each calendar. These are a print and cut… You will need to make sure you have clicked on the Registration Marks Settings Window. In the upper right corner of your screen. Click on the print button next to the cut button on the left side of screen. Once printed, put paper onto sticky mat with the circle in the upper left corner of mat. Then load into the Silhouette. Be sure that the Silhouette reads the registration marks. I do this manually; it just seems to work better for me. Click to use manual option in the right Column. Arrow up and down side to side to get the cutter right over the dot. Then send to be cut.
 
4.   Find the Pattern paper with the circles load it into the Silhouette machine. Open another two windows in the Silhouette software. Find the download for the book and pages. Click on the one with the pages. Scale everything down to 3”x 3”. Ungroup everything, Highlight one of the pages and make a duplicate then rearrange everything on your page to accommodate the new page. (I chose to omit the single square) Then Cut.


5.     Find the Part two to the 3D album the box. Scale everything down to 3”x 3”. Ungroup everything. Move the cover panels to the side. Load the Kraft cardstock into your Silhouette and cut out box.
6.   Go back to Silhouette software page and move the box to the side. Move the covers of the box into the print field. Select one of the long rectangles and make a copy of it, This will make three in total. Find the chevron paper load it into the Silhouette and cut.


7.   Here are all your cut outs…. 4 pages, three rectangle strips, two covers, binding yellow chevron, 2 Kraft box pieces. Note: I discarded the orange rectangle.


8.    Assemble the box. Crease all perforated areas to one side. Then glue the sides of the box together and hold. Then glue the bottom flap inside the box.


9.  Glue the cover panels to the box as well as all three of the rectangles.


  10. Find your cut out pages. You will notice that there is one center that is wide, two with medium centers and one with a small center. Crease them and stack them with the largest on the outside and small in the center. 

11.   Find the largest one and this is your cover. Take the yellow chevron binder and glue to the front of your book.
BE SURE TO LINE UP THE HOLES.
Note: Once everything was how I wanted it
I put some glue down the center of the pages to hold it better.  Then add it back to your stacked pages.


12.  Take a fair amount of twine and lace it through the bottom holes starting on the inside of your book. So that the ends will be on the outside of the book.

 
13.  Lace the other side. Tie in a bow with a double knot.

 
14.  Find your calendar cut outs and start gluing January to the first page of your book and so on.

15.  Decorate the cover of your box. Find the “You & Me” tap sticker and place it on the right side. Also locate two photo corners: Place one on the upper left side and one on the lower right side.

 
16.  Find some Numbers and letter stickers… Whatever you have in your stash will do. Spell out 2013 Calendar.

17.  Find the Enamel dots. Use one large orange, one medium yellow and a small pink place in the bottom left corner.
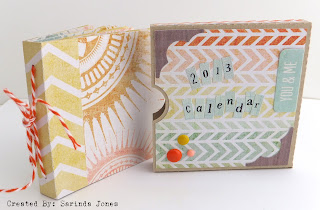
 18.  Congratulations: you have completed the stunning 2013 pocket Calendar. I made a few of these for the gift-giving season. 

Friday, December 28, 2012

FotoBella.com Give-Away


DO you want to win some prizes from FotoBella.com?

WHY Not?


All you need to do is do a layout using this sketch... 
on the right of the image above.
Then post it on FotoBella.com Facebook page before 1.6.2013.

I created this sketch. Yes my first ever. 
So please join in the fun I would love to see what you do with your creations.
Sarinda


Wednesday, December 26, 2012

SDC80: Out with the old, in with the new


Out with the old, In with the new.


Use something Old and Something New
On your project with a New Year's Theme

 My Team mate Clarie is asking us to use something old with something new.
I came across some old sequence laying around in my stash of goodies and glassine bags. And immediately thought of New Year's Eve. We celebrate by visualizing a dream we have and at the strike of midnight we throw the confetti into the air .
The OLD is my Sequence and my NEW are some New stamps from Stampotique.

Stamps I used from left to right.

Back Row:
Middle Row:
Front Row:

Hope you will play along with us at the Stampotique Designers Blog.
You could win some of the Off Color Stamps-!!

Face the brilliance of your most wonderful creations and dwell on your dreams.
Warmly-
Sarinda


SDC80: Out with the old, in with the new....

Hi. Claire here hoping you all had a very Merry Christmas and wishing you all a Happy New Year. I'm hosting the challenge this week which is "Out with the old and in with the new".

If you were very lucky I'm sure that Santa will have bought you lots of new stash to play with, so you can either make a project using a combination of old and new stash (just don't forget to tell us what it is). Alternatively you might like to make something to celebrate the new year. The choice is yours!

I can't wait to see what you make.

Claire x

Sunday, December 23, 2012

Saturday, December 22, 2012

Teacher Holiday Gifts


Packaging Is just as important as the Gift-!


Just my opinion. 
There is nothing like getting a well packaged gift. 
The excitement of what may be inside. 
All good things come in small packages. Right?

 I have made some jewelry for my Son's teachers.
Truly hoping they will all love the creations.
They all take great care of him and would like to return a small token 
of my appreciation.

Happy Holidays-!
Sarinda

Thursday, December 20, 2012

Basic Grey Lucille Ornament & Fotobella.com


Hello Crafties....

Here is a video tutorial on how to make a paper Ornament.

I used Basic Grey Lucille Bundle. 

From FotoBella.com
These make great last minute gifts.
You could even make this larger for a door wreath-!!!
Hmmm. I just might have to try that.
Enjoy-!
Sarinda 


Wednesday, December 19, 2012

Tim Holtz 12 Tags of DECEMBER


Hello...

I wanted to join in the fun with Tim Holtz and the

I have not played along for awhile and have wanted to. So here it goes.

 I have been on a ornament kick lately and this really is not a tag.
However- I have been using it as a tag.
Making a few of these for friends and attached them to a bag of 
LINDOR Chocolates for Holiday gifts.

Hope you are enjoying your soon to be Holiday.
Warmly-
Sarinda

SDC79: Ornament

So are we Ready YET....

The Holiday is approaching ever so quickly. Right?

My Stampotique Team Mate Maria is asking us to make a last minute ornament for the tree.
I love making ornaments. 
Maybe it is because they are 3 dimensional.
I hope that you will visit the other creations from my team mates at 
They are really talented folks and they always get my creative juices to flow.
ENJOY your creativity-!


SDC79: Last minute- handmade ornament for X-mas tree
I used Stamp Candle

Monday, December 17, 2012

Mini Art Journal: Hearing You-!


Hello Crafties...

Here is a peek into my daily journal.
As an Artist I am accustom to critiques and welcome them as it helps to challenge myself.
However- sometimes the critique is less than a critique and more insulting. lol

"A grain of salt my friends."

It always feels good to get those feelings out and I am always amazed at what beauty comes out of it.

"Hearing the Sound of the THINGS you said today."

Wishing you a creative release today.
Warmly-
Sarinda

Friday, December 14, 2012

Snow Day-!!!


A few weeks back we got a ton of snow...
It was truly a winter wonderland and so much fun to build a snow fort.

For this layout I used 
Winter Wonderland My Mind's Eye 
6"x6" pad
Enamel Dots
Decorative Buttons

Studio Calico
Wood Veneer

Keep Warm-!
Sarinda

Wednesday, December 12, 2012

SDC78: Making Christmas Cards


Making Christmas cards with non-Christmas stamps.

Hello Again... It's Party Time....

Here is a great Challenge from my Stampotique Team Mate
France Papillon
She always has a good challenge for us.
Today- we are asked to create Christmas cards with NON Christmas Stamps.
This was a fun challenge.

Hope you will take the time to check out the others work at
Stampotique Designer Challenge
as well as play along with us.
You could win some Stampotique Stamps.

Friday, December 7, 2012

Reindeer Tag: Teresa Collins Christmas Cottage


 Reindeer Tag

Hello Everyone.... 

Sarinda here with the Fotobell.com Design Team.
I have something new and fun for you to try.
How to take a bundle and by just adding a sheet of white cardstock you can change 
the whole look of your creations. 
I love all the bundles from Fotobella.com, they are but together so well.

This tag can be given as a gift for a tree ornament or perhaps as part of your wrapping.
Ok get ready.... Here we go-!

Supplies:
Teresa Collins Christmas Cottage Bundle #1
Stamps
Countdown paper side B
Twine
Chipboard Stickers
Crystal Brads
Music Paper and Brad Set

Other Supplies:
White Cardstock
White Tag
Dimensional Tape
Disstress Pad in Antique Linen & Walnut Stain
White Acrylic Paint
3 types of lace (each a bit smaller than the next)
Clear embossing powder
Fine Holographic Glitter
Perfect Medium Ranger
String and twine
Water

Tools:
Silhouette Cameo
Scissors
Glue Gun
Blending tool
Sponge brush
Kraft mat
Acrylic stamping block
Heat tool
Snowflake punch or use silhouette cameo
Plastic bowl with lid
Plastic spoon


1. Gather your supplies....
I know that this tag is quite different in color and is muted in comparison to this bundle. My goal here is to show you how versatile this bundle is. By creating a completely different look by just adding white cardstock.


2. Place snowflake stamps onto the acrylic block in a random pattern. Put clear embossing powder into a plastic container and add some glitter to the bowl, mix together with plastic spoon. Then stamp snowflakes onto the tag with Perfect medium. Hold tag over bowl and apply the clear embossing powder and glitter to the tag. Gently tap to remove excess powder and glitter. Use heat tool to set.


3. Using the blending tool and Antique Linen Distress ink apply to the edges and all over the body of the tag. Then use Walnut Stain and blending tool just on the edges of the tag.


4. Starting with the thickest lace add this to the bottom of your tag with the hot glue gun. Repeat this with the medium lace and then the smallest lace on top.


5.  Find the “Tis’ The Season” Chipboard Sticker and place just above the lace. Do not press down too hard you may change your mind where it really goes. Just stage it for now.


 6.  Punch out three snowflakes from white cardstock and bend them up with your fingers to give a bit of dimension.  


7.   Find the brad with the music pattern paper behind it. Remove the center brad and put it back on the brad folder. We are only using the paper. Locate three clear crystal brads.


8.  We are now going to mute the music brad paper with white acrylic paint and water. Place a small dot of white acrylic paint onto your craft mat add a bit of water to thin paint. Using the sponge brush add to the body of the music paper with a bit more on the edges. Dry with heat tool. Layer the music paper, snowflake and crystal brad.


9.  On Silhouette cut out a Reindeer head approximately ¾ the size of your tag. Add two layers of dimensional tape to the back of the deer head. You just want this to pop off the page a bit more than normal.


10.  Arrange everything how you like it first before you glue. (Staging is the biggest tip I could give you.) Notice that I inched out the Chipboard sticker a bit to make room for the snowflakes and bow? Once you are pleased as punch with the arrangement start to l glue. I started with the deer and work outward.

11.  Make a bow and add it to the tag using the glue gun, just under the largest brad with music paper. Don’t forget to add the twine and string to the top of your tag. I will be using mine as a gift tag or I will add an ornament wire to the top and give as a tree ornament.

Congrats….  You have made a beautiful, stylish tag.
Enjoy-
Sarinda